I have my xcode project named as "SocketTest", and I want to use it in my another application.
For this I have to create it's framework, because if I directly drag and drop it will increase the application size. So I have been searching for a way to create a static library. I figured out how to do so but then had the issue of creating a static library that was only one file and worked with both iOS devices (arm6 and arm7 architectures and the iOS Simulator (i386 architecture). I finally got that to work but then ran into another problem. I was using the MapKit library which is unavailable in the i386 version. I could not figure out a way to make all of these work together. Finally, I figured out how to create a framework instead of a library.
Apple also approve apps with custom frameworks.
Let's proceed further how to build our own custom framework that will be re-usable, can use any other framework, and will work with both iOS devices and the iOS Simulator.
Step 1: Create a New Bundle Target

A bundle is used here because it will allow us to store xib files, as well as source code and any other resources we need. My new bundle target will be name "iSocket".
Step 2: Configure Bundle Target

Here is a list of the changes that need to be made:

This file should have a line "#import <Cocoa/Cocoa.h>" and that line must be removed
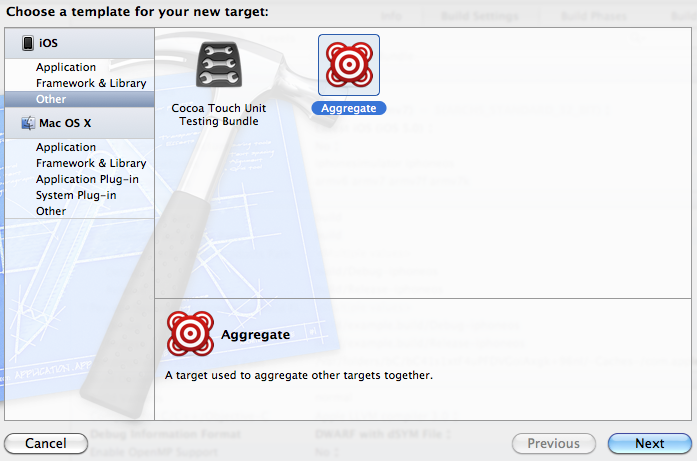
Step 5: Create Aggregate Target

I have named my aggregate target "exampleAggregate". The aggregrate is the final target and when it is built it will turn the code into a framework.
Step 6: Configure Aggregate Target

Step 7: Build the Aggregate Target
We have completed all necessary steps and your framework is ready to build. Now build the aggregate target and bundle target, you will find a new folder under <project root directory>\Products and it will be given the name <bundle name>.framework. This is your new framework! It contains the header files that developers will need and the compiled source code.
Your next step will be to create a project that uses this framework. When you do so you will want to import the framework. Do this by navigating to the "Build Settings" tab under your app target then click the "+" under "Link Binaries with Libraries" just as you would with any standard framework. The only difference is that your framework will not be in the list. You will have to click "Add Other..." then navigate to the <bundle name>.framework folder. Select that folder and click "Open".

Your new framework has been added and you or the other developer can begin developing!
For this I have to create it's framework, because if I directly drag and drop it will increase the application size. So I have been searching for a way to create a static library. I figured out how to do so but then had the issue of creating a static library that was only one file and worked with both iOS devices (arm6 and arm7 architectures and the iOS Simulator (i386 architecture). I finally got that to work but then ran into another problem. I was using the MapKit library which is unavailable in the i386 version. I could not figure out a way to make all of these work together. Finally, I figured out how to create a framework instead of a library.
Apple also approve apps with custom frameworks.
Let's proceed further how to build our own custom framework that will be re-usable, can use any other framework, and will work with both iOS devices and the iOS Simulator.
Step 1: Create a New Bundle Target

Step 2: Configure Bundle Target

- Base SDK = Latest iOS
- Architectures = Standard
- Build Active Architecture = No
- Valid Architectures = $(ARCHS_STANDARD_32_BIT)
- It is important to copy this string exactly as is
- Dead Code Stripping = No
- This is because Apple does not want you to have a dynamic library. This enables that "static" part of the framework
- Link With Standard Libraries = No
- Any libraries required by your framework will have to be imported into the project that uses your framework
- ie- If your framework requires MapKit (like mine did) then the app that uses your framework will need to add MapKit to the imported frameworks
- Match-O Type = Relocatable Object File
- Wrapper Extension = framework
Step 3: Complete Bundle Target Setup

- Now that we have the source code complete, go back to the target bundle we created and navigate to the "Build Phases" tab.
- Expand the "Compile Sources" section. Here we will add all *.m files that need to be compiled. Basically, any of the code that was written in the previous step (not including header files) should be added here. In my case, publicClass.m and privateClass.m are being added.
- If your framework is using any other frameworks (such as MapKit) add it to "Link Binary with Libraries"
- If you have any additional resources, add them to the "Copy Bundle Resources" section.
- Add "Copy Headers" as a new Build Phase
- Add header files to the "Copy Headers" section
- Any header files that should be public should be added and placed under "Public"
- Any header files that should be private should be added and placed under "Private"
#import <exampleBundle/exampleHeader.h>instead of importing every header file. This may be overkill for this example framework but it will be much appreciated by the developer if you build a complex framework that has several header files.
This file should have a line "#import <Cocoa/Cocoa.h>" and that line must be removed
Step 6: Configure Aggregate Target
- Go to the "Build Phases" tab of the newly created aggregate target.
- Add a new "Run Script" as a build phase.
- Set the script to be the following where FMK_NAME is the name of your new framework:
# Sets the target folders and the final framework product.
FMK_NAME=SocketTest
FMK_VERSION=A
# Install dir will be the final output to the framework.
# The following line create it in the root folder of the current project.
INSTALL_DIR=${SRCROOT}/Products/${FMK_NAME}.framework
# Working dir will be deleted after the framework creation.
WRK_DIR=build
DEVICE_DIR=${WRK_DIR}/Release-iphoneos/${FMK_NAME}.framework
SIMULATOR_DIR=${WRK_DIR}/Release-iphonesimulator/${FMK_NAME}.framework
# Building both architectures.
xcodebuild -configuration "Release" -target "${FMK_NAME}" -sdk iphoneos
xcodebuild -configuration "Release" -target "${FMK_NAME}" -sdk iphonesimulator
# Cleaning the oldest.
if [ -d "${INSTALL_DIR}" ]
then
rm -rf "${INSTALL_DIR}"
fi
# Creates and renews the final product folder.
mkdir -p "${INSTALL_DIR}"
mkdir -p "${INSTALL_DIR}/Versions"
mkdir -p "${INSTALL_DIR}/Versions/${FMK_VERSION}"
mkdir -p "${INSTALL_DIR}/Versions/${FMK_VERSION}/Resources"
mkdir -p "${INSTALL_DIR}/Versions/${FMK_VERSION}/Headers"
# Creates the internal links.
# It MUST uses relative path, otherwise will not work when the folder is copied/moved.
ln -s "${FMK_VERSION}" "${INSTALL_DIR}/Versions/Current"
ln -s "Versions/Current/Headers" "${INSTALL_DIR}/Headers"
ln -s "Versions/Current/Resources" "${INSTALL_DIR}/Resources"
ln -s "Versions/Current/${FMK_NAME}" "${INSTALL_DIR}/${FMK_NAME}"
# Copies the headers and resources files to the final product folder.
cp -R "${DEVICE_DIR}/Headers/" "${INSTALL_DIR}/Versions/${FMK_VERSION}/Headers/"
cp -R "${DEVICE_DIR}/" "${INSTALL_DIR}/Versions/${FMK_VERSION}/Resources/"
# Removes the binary and header from the resources folder.
rm -r "${INSTALL_DIR}/Versions/${FMK_VERSION}/Resources/Headers" "${INSTALL_DIR}/Versions/${FMK_VERSION}/Resources/${FMK_NAME}"
# Uses the Lipo Tool to merge both binary files (i386 + armv6/armv7) into one Universal final product.
lipo -create "${DEVICE_DIR}/${FMK_NAME}" "${SIMULATOR_DIR}/${FMK_NAME}" -output "${INSTALL_DIR}/Versions/${FMK_VERSION}/${FMK_NAME}"
rm -r "${WRK_DIR}"

Step 7: Build the Aggregate Target
We have completed all necessary steps and your framework is ready to build. Now build the aggregate target and bundle target, you will find a new folder under <project root directory>\Products and it will be given the name <bundle name>.framework. This is your new framework! It contains the header files that developers will need and the compiled source code.
Your next step will be to create a project that uses this framework. When you do so you will want to import the framework. Do this by navigating to the "Build Settings" tab under your app target then click the "+" under "Link Binaries with Libraries" just as you would with any standard framework. The only difference is that your framework will not be in the list. You will have to click "Add Other..." then navigate to the <bundle name>.framework folder. Select that folder and click "Open".

Your new framework has been added and you or the other developer can begin developing!
Happy Coding :)
Hi Archana, thanks. Please write new tutorials. waiting...
ReplyDelete-faris
@Faris Thanks ! on which topic exactly you want tutorials ?
ReplyDeleteThanks for sharing as it is an excellent post would love to read your future post
ReplyDeleteiPad Application Developer