Tuesday, April 9, 2019

JMeter Vs Gatling Automation tools


JMeter Vs Gatling Automation tools


S.No. Features Jmeter Gatling
1 First released 1998 2011
2 Based on Java Scala
3 Size (of tool code base) approx 500K lines code approx 50K lines code
4 HTTP Yes Yes
5 HTTPS Yes Yes
6 WebSocket Yes(external plugins may be required) Yes
7 Rest Apis Yes Yes
8 Soap Services Yes No
9 FTP Yes No
10 JDBC Yes No
11 Database via JDBC Yes No
12 JMS Yes Yes
13 TCP Yes No
14 HTTP Recorder Yes (Built in proxy recorder to generate the requests from the user navigation.) Yes (Has a separate Web proxy recorder, which works the same way as the JMeter recorder. It generates a Scala simulation from the recorded user session.)
15 Distributed Testing (Distributed Testing is the ability to use several slaves computers as load generators to spread the load over multiple machines to be able to simulate more concurrent users.) Yes No
16 Scripting GUI Scripting Code Scripting
17 Command-Line Mode Yes Yes
18 Assertions Yes Yes
19 Response Extractors Yes Yes
20 Documentation (Installation, Quick Start, Reference Guide, Tutorials, Issue Tracker, On Stackoverflow) Yes Yes
21 Archive Format Setup Yes Yes
22 Installer Format Setup No No
23 Command-line Executable Setup Yes Yes
24 GUI Executable Setup Yes No
25 Requires Java Setup Yes Yes
26 Target Audience QA Engineers Devops Engineers
27 Performance One Thread = One User Paradigm.
The user waits for the server response when sending a request.
Synchronous processing.
Simulate multiple virtual users with a single Thread.
It allows fully asynchronous computing
ASynchronous processing.
28 Test Execution To launch a test with JMeter, there are two methods:
1. Launch the GUI, then launch the test inside GUI,
2. Launch the test via command-line (recommended because using GUI listeners consumes a lot of memory.).
To launch a test with gatling, run the .sh script and select the simulation (within user-files/simulations folder).

During the test run, gatling displays statistics within the console. The results of the test can be viewed at the end of the test. Gatling generates a generic test report with response time, number of OK/KO transactions and detailed statistics for every request. The report is not customizable.
29 Command-line live metrics during test Yes Yes
30 HTML Report Yes Yes
31 Raw Results during test execution Yes Yes
32 UI Results of test Yes No
33 Graphite Support Yes Yes
34 Grafana + InfluxDB Yes Yes
35 Cloud load testing Yes (Better cloud support than Gatling). Yes (But not better that JMeter).

Thursday, November 13, 2014

Programming with Swift for iOS !


What is swift?
  • A new programming language for iOS and OSX app development.
  • Adopts modern programming patterns and features to make programming easier and flexible.
  • Provides seamless access to existing Cocoa frameworks and mix-and-match interoperability with Objective-C code.
  • First industrial-quality systems programming language that is as expressive and enjoyable as a scripting language.

New in swift
  • Support for functional programming patterns like maps and filters.
  • Structs support protocols, methods and extensions.
  • Support for Generics and optionals.
  • Support for tuples and hence functions that can return multiple values.
Why use swift?
  • About 2.8X faster than objective C.
  • A compiled programming language with syntax similar to scripting languages.
  • Improved readability over other languages by removing extraneous parenthesis and semi colons.
  • Enums and control flows have been vastly improved.

Tools Needed
  • Needs Apple LLVM 6.0 for compilation, which is shipped with Xcode 6.0.
  • Uses the same runtime as existing Objective-C system on Mac OS and iOS.
  • Backward compatible up-to iOS 7.0.
Introduction to “Playground”
  • A new type of file that allows you to test out Swift code, and see the results of each line in the sidebar.
  • Results appear on the sidebar as soon as any code is typed.
  • Great way to learn about Swift, to experiment with new APIs, to prototype code or algorithms.
Objective C Vs Swift
  • Closures: Closures are self-contained blocks of functionality that can be passed around and used in your code. Closures in Swift are similar to blocks in C and Objective-C.
  • AnyObject: The equivalent of ‘id’ from Objective C, is ‘AnyObject’ in swift.
  • Introspection: The equivalent of doing if ([obj isKindOfClass:[NSString class]]) { ... }) in swift is if obj is String.


Monday, March 10, 2014

iOS Keychain: Sharing data between iOS apps !

Save data in keychain from one iOS app and access it from another iOS app (Xcode 5) !


Creating your first app that will write to the Keychain


Settings for project : 
  1. Add the Security.framework to your project.
  2. Download UICKeyChainStore  and add the UICKeyChainStore.h and UICKeyChainStore.m files from Lib folder to your project.
  3. Go to Target -> Capabilities -> Keychain Sharing. By default it is off. On this option.
  4. As you will on it, a file name projectName.entitlements will add in your "Project Navigator", with key "Keychain Access Groups" of type "Array" with one "Item" of type "String" and Value "$(AppIdentifierPrefix)$(CFBundleIdentifier)". For example : com.my.firstApp is the Bundle identifier then Value will be "$(AppIdentifierPrefix)com.my.firstApp". It will look like this : 


Now all you need to do is start using the UICKeyChainStore and you'll be saving data to the KeyChain.

Now, in your class import "UICKeyChainStore.h" and write the following code: 

[UICKeyChainStore setString:@"mySecretPassword" forKey:@"password" service:@"MyService"];

[UICKeyChainStore stringForKey:@"password" service:@"MyService"];

Specifying the service allows you to store keys for a particular service, maybe you have a Twitter or Facebook specific set of keys you wish to save.

As you can see we are not specifying the accessGroup. By default it will pick the first access-group specified in your projectName.entitlements when writing and will search across all access-groups when none is specified.

Allowing your second app to access your shared keychain data:

Settings for project : 
  1. Repeat above steps from 1 to 3 (for firstApp). It will look like this : 


We want access to the Keychain group $(AppIdentifierPrefix)com.my.firstApp for reading, but we still want the default writing to occur in our own keychain group so we still specify $(AppIdentifierPrefix)com.my.secondApp as the first / default group. Add one more item in "Keychain Access Groups" with Value $(AppIdentifierPrefix)com.my.firstApp

It will look like this: 


Now, read the value from the shared Keychain exactly how we did in our first app.

In your class import "UICKeyChainStore.h" and write the following code: 

[UICKeyChainStore stringForKey:@"password" service:@"MyService"];

This should return the value “mySecretPassword” :)


Happy Coding :)


Tuesday, October 1, 2013

Send Mail with multiple attachments to multiple recipients through AppleScript !


#Read file for mail body
set filePath to "/Users/......../MailBodyText.txt"
set theContent to (read filePath)

                 OR

#Compose mail body
set theContent to "Hi,

New build is available. Please find the details below:
Version: 1.1.1
URL:http://...........ipa

Detailed release note is attached for your reference.

Regards,
Dev-Team
"

#set file for attachment
set theAttachment1 to POSIX file "/Users/............/release_notes.xls"

#set Another attachment for latest log file
set attachFilePath to "/Users/....../builds/" & LatestFolderName & "/log"
set theAttachment2 to POSIX file attachFilePath


#Set Recipients
set nameList to {"Archana Chaurasia", "Recipient2", "Recipient3"}
set addressList to {"archana.2207@gmail.com", "Recipient2@test.com", "Recipient3@test.com"}

#Mail Tell Block
tell application "Mail"
           #Create the message
           set theMessage to make new outgoing message with properties {subject:releaseVersion, content:theContent, visible:true}
           #Set a recipient
           tell theMessage
              make new attachment with properties {file name:theAttachment1} at after the last paragraph
              make new attachment with properties {file name:theAttachment2} at after the last paragraph
              repeat with i from 1 to count nameList
                        make new to recipient at end of to recipients with properties {name:item i of nameList, address:item i of addressList}
              end repeat
#Send the Message
            send
            end tell

end tell

Monday, September 30, 2013

Read values of properties from plist through AppleScript !

#Read Bundle Version from info.plist through AppleScript !


set the plistfile_path to "/Users/................/AppName-Info.plist"

tell application "System Events"
set p_list to property list file (plistfile_path)
set releaseVersion to value of property list item "CFBundleVersion" of p_list
end tell

Get log file from latest folder through AppleScript !

#This AppleScript is for get latest log file generated during automatic build server.

set sourceFolder to "Users:....:.....:targetFolder"

property the_path : "/Users/..../.../targetFolder"
set theFolder to (POSIX file the_path) as alias

tell application "Finder"
set itemGroup to sort (get every folder of theFolder) by creation date
set LatestFolder to (get first item of itemGroup)
set LatestFolderName to LatestFolder's name
end tell

set latestFilePath to "/Users/..../..../targetFolder/" & LatestFolderName & "/log"


#This AppleScript is for get latest folder and it's name.


set sourceFolder to "Users:....:.....:targetFolder"

property the_path : "/Users/..../.../targetFolder"
set theFolder to (POSIX file the_path) as alias

tell application "Finder"
set itemGroup to sort (get every folder of theFolder) by creation date
set LatestFolder to (get first item of itemGroup)
set LatestFolderName to LatestFolder's name
end tell


Create ipa and plist file and upload files on server for Enterprise Application through Terminal !

cd "Applications path"

#Compile the build

xcodebuild -target AppTargetName -sdk iphoneos -configuration Release

#Archive the build

/usr/bin/xcrun -sdk iphoneos PackageApplication -v $applicationPath -o $ipaPath --sign Barclays --embed $mobileprovisionPath


#create the plist

echo "<?xml version=\"1.0\" encoding=\"UTF-8\"?>
<!DOCTYPE plist PUBLIC \"-//Apple//DTD PLIST 1.0//EN\" \"http://www.apple.com/DTDs/PropertyList-1.0.dtd\">
<plist version=\"1.0\">
<dict>
<key>items</key>
<array>
<dict>
<key>assets</key>
<array>
<dict>
<key>kind</key>
<string>software-package</string>
<key>url</key>
<string>$urlForIpa</string>
</dict>
</array>
<key>metadata</key>
<dict>
<key>bundle-identifier</key>
<string>$bundleIdentifier</string>
<key>bundle-version</key>
<string>$bundleVersion</string>
<key>kind</key>
<string>software</string>
<key>title</key>
<string>AppName</string>
</dict>
</dict>
</array>
</dict>
</plist>" > "projectName.plist"


#upload files on server

Below values depends on your server inputs values !

curl --form ipa=@$ipaPath --form plist=@$plistPath --form os=$os --form branch=$branch --form type=$type --form version=$bundleVersion --form file_size=22MB --form info=$bundleVersion --form releasenotes=@$releasenotes --form smartphones=$smartphones --form tablets=$tablets $urlToUploadfiles


Thursday, May 16, 2013

How to  know device type (Simulator, iPhone, iPod, iPad, iPad mini, Apple TV) programmatically ?
OR
How to  know device model (iPad1, iPad2... etc) or (iPhone, iPhone4s...etc) programmatically ?


#import <sys/utsname.h>

struct utsname systemInfo;
uname(&systemInfo);

NSString *modelName = [NSString stringWithCString:systemInfo.machine
                                         encoding:NSUTF8StringEncoding];

NSString *machineName = [NSString stringWithCString:systemInfo.machine
                                           encoding:NSUTF8StringEncoding];


NSString *modelNumber = @"?";

//Simulator

if([modelName isEqualToString:@"i386"] || [modelName isEqualToString:@"x86_64"]) {
    modelName = @"iPhone Simulator";
}

//iPhone

else if([modelName isEqualToString:@"iPhone1,1"]) {
    modelName = @"iPhone";
    modelNumber = @"A1203";
}
else if([modelName isEqualToString:@"iPhone1,2"]) {
    modelName = @"iPhone 3G";
    modelNumber = @"A1241/A1324";
}
else if([modelName isEqualToString:@"iPhone2,1"]) {
    modelName = @"iPhone 3GS";
    modelNumber = @"A1303/A1325";
}
else if([modelName isEqualToString:@"iPhone3,1"]) {
    modelName = @"iPhone 4 (GSM)";
    modelNumber = @"A1332";
}
else if([modelName isEqualToString:@"iPhone3,2"]) {
    modelName = @"iPhone 4 GSM Rev A";
    modelNumber = @"?";
}
else if([modelName isEqualToString:@"iPhone3,3"]) {
    modelName = @"iPhone 4 (CDMA)";
    modelNumber = @"A1349";
}
else if([modelName isEqualToString:@"iPhone4,1"]) {
    modelName = @"iPhone 4S";
    modelNumber = @"A1387/A1431";
}
else if([modelName isEqualToString:@"iPhone5,1"]) {
    modelName = @"iPhone 5 (GSM)";
    modelNumber = @"A1428";
}
else if([modelName isEqualToString:@"iPhone5,2"]) {
    modelName = @"iPhone 5 (GSM+CDMA)";
    modelNumber = @"A1429/A1442";
}

//iPod touch

else if([modelName isEqualToString:@"iPod1,1"]) {
    modelName = @"iPod touch 1G";
    modelNumber = @"A1213";
}
else if([modelName isEqualToString:@"iPod2,1"]) {
    modelName = @"iPod touch 2G";
    modelNumber = @"A1288";
}
else if([modelName isEqualToString:@"iPod3,1"]) {
    modelName = @"iPod touch 3G";
    modelNumber = @"A1318";
}
else if([modelName isEqualToString:@"iPod4,1"]) {
    modelName = @"iPod touch 4G";
    modelNumber = @"A1367";
}
else if([modelName isEqualToString:@"iPod5,1"]) {
    modelName = @"iPod touch 5G";
    modelNumber = @"A1421";
}

//iPad

else if([modelName isEqualToString:@"iPad1,1"]) {
    modelName = @"iPad 1G";
    modelNumber = @"A1219/A1337";
}
else if([modelName isEqualToString:@"iPad2,1"]) {
    modelName = @"iPad 2 (WiFi)";
    modelNumber = @"A1395";
}
else if([modelName isEqualToString:@"iPad2,2"]) {
    modelName = @"iPad 2 (GSM)";
    modelNumber = @"A1396";
}
else if([modelName isEqualToString:@"iPad2,3"]) {
    modelName = @"iPad 2 (CDMA)";
    modelNumber = @"A1397";
}
else if([modelName isEqualToString:@"iPad2,4"]) {
    modelName = @"iPad 2 (WiFi + Rev A)";
    modelNumber = @"A1395";
}
else if([modelName isEqualToString:@"iPad3,1"]) {
    modelName = @"iPad 3 (WiFi)";
    modelNumber = @"A1416";
}
else if([modelName isEqualToString:@"iPad3,2"]) {
    modelName = @"iPad 3 (GSM+CDMA)";
    modelNumber = @"A1403";
}
else if([modelName isEqualToString:@"iPad3,3"]) {
    modelName = @"iPad 3 (GSM)";
    modelNumber = @"A1430";
}
else if([modelName isEqualToString:@"iPad3,4"]) {
    modelName = @"iPad 4 (WiFi)";
    modelNumber = @"A1458";
}
else if([modelName isEqualToString:@"iPad3,5"]) {
    modelName = @"iPad 4 (GSM)";
    modelNumber = @"A1459";
}
else if([modelName isEqualToString:@"iPad3,6"]) {
    modelName = @"iPad 4 (GSM+CDMA)";
    modelNumber = @"A1460";
}

//iPad mini

else if([modelName isEqualToString:@"iPad2,5"]) {
    modelName = @"iPad mini (WiFi)";
    modelNumber = @"A1432";
}
else if([modelName isEqualToString:@"iPad2,6"]) {
    modelName = @"iPad mini (GSM)";
    modelNumber = @"A1454";
}
else if([modelName isEqualToString:@"iPad2,7"]) {
    modelName = @"iPad mini (GSM+CDMA)";
    modelNumber = @"A1455";
}

//Apple TV, just for funn:)

else if([modelName isEqualToString:@"AppleTV2,1"]) {
    modelName = @"Apple TV 2G";
    modelNumber = @"A1378";
}
else if([modelName isEqualToString:@"AppleTV3,1"]) {
    modelName = @"Apple TV 3G";
    modelNumber = @"A1427";
}
else if([modelName isEqualToString:@"AppleTV3,2"]) {
    modelName = @"Apple TV 3G (Rev A)";
    modelNumber = @"A1469";
}

NSLog(@"Device model: %@/ %@",modelName,modelNumber);

Happy Coding :)

Wednesday, September 26, 2012

Create Framework of an existing xcode project (Custom Framework)

I have my xcode project named as "SocketTest", and I want to use it in my another application.
For this I have to create it's framework, because if I directly drag and drop it will increase the application size. So I have been searching for a way to create a static library. I figured out how to do so but then had the issue of creating a static library that was only one file and worked with both iOS devices (arm6 and arm7 architectures  and the iOS Simulator (i386 architecture). I finally got that to work but then ran into another problem. I was using the MapKit library which is unavailable in the i386 version. I could not figure out a way to make all of these work together. Finally, I figured out how to create a framework instead of a library. 

Apple also approve apps with custom frameworks. 

Let's proceed further how to build our own custom framework that will be re-usable, can use any other framework, and will work with both iOS devices and the iOS Simulator.

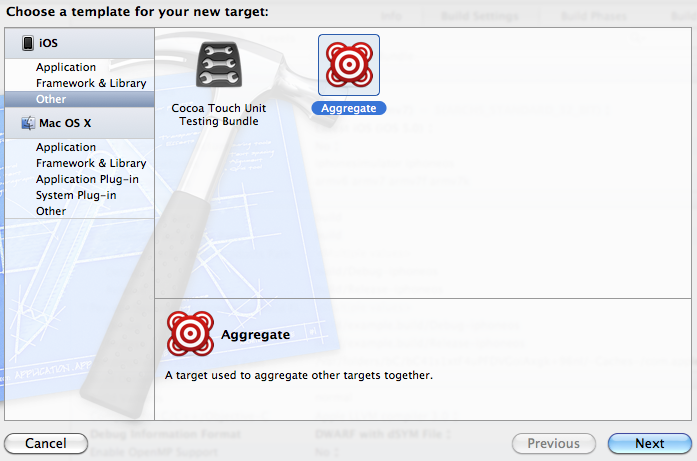
Step 1: Create a New Bundle Target


A bundle is used here because it will allow us to store xib files, as well as source code and any other resources we need. My new bundle target will be name "iSocket".

Step 2: Configure Bundle Target


Here is a list of the changes that need to be made:
  1. Base SDK = Latest iOS
  2. Architectures = Standard
  3. Build Active Architecture = No
  4. Valid Architectures = $(ARCHS_STANDARD_32_BIT)
    • It is important to copy this string exactly as is
  5. Dead Code Stripping = No
    • This is because Apple does not want you to have a dynamic library. This enables that "static" part of the framework
  6. Link With Standard Libraries = No
    • Any libraries required by your framework will have to be imported into the project that uses your framework
    • ie- If your framework requires MapKit (like mine did) then the app that uses your framework will need to add MapKit to the imported frameworks
  7. Match-O Type = Relocatable Object File
  8. Wrapper Extension = framework
 Step 3: Complete Bundle Target Setup


  • Now that we have the source code complete, go back to the target bundle we created and navigate to the "Build Phases" tab.
  • Expand the "Compile Sources" section. Here we will add all *.m files that need to be compiled. Basically, any of the code that was written in the previous step (not including header files) should be added here. In my case, publicClass.m and privateClass.m are being added.
  • If your framework is using any other frameworks (such as MapKit) add it to "Link Binary with Libraries"
  • If you have any additional resources, add them to the "Copy Bundle Resources" section.
  • Add "Copy Headers" as a new Build Phase
  • Add header files to the "Copy Headers" section
    • Any header files that should be public should be added and placed under "Public"
    • Any header files that should be private should be added and placed under "Private"
*Note: I also created a header file named "exampleHeader.h". This header file simply imports all of the public header files in my framework. Now, when another developer uses this framework he/she can just use
#import <exampleBundle/exampleHeader.h>
instead of importing every header file. This may be overkill for this example framework but it will be much appreciated by the developer if you build a complex framework that has several header files. 
    Step 4: Fix <bundle name>-Prefix.pch

     This file should have a line "#import <Cocoa/Cocoa.h>" and that line must be removed

    Step 5: Create Aggregate Target


    I have named my aggregate target "exampleAggregate". The aggregrate is the final target and when it is built it will turn the code into a framework.

    Step 6: Configure Aggregate Target

    1. Go to the "Build Phases" tab of the newly created aggregate target.
    2. Add a new "Run Script" as a build phase.
    3. Set the script to be the following where FMK_NAME is the name of your new framework:
    # Sets the target folders and the final framework product.
    FMK_NAME=SocketTest
    FMK_VERSION=A

    # Install dir will be the final output to the framework.
    # The following line create it in the root folder of the current project.
    INSTALL_DIR=${SRCROOT}/Products/${FMK_NAME}.framework

    # Working dir will be deleted after the framework creation.
    WRK_DIR=build
    DEVICE_DIR=${WRK_DIR}/Release-iphoneos/${FMK_NAME}.framework
    SIMULATOR_DIR=${WRK_DIR}/Release-iphonesimulator/${FMK_NAME}.framework

    # Building both architectures.
    xcodebuild -configuration "Release" -target "${FMK_NAME}" -sdk iphoneos
    xcodebuild -configuration "Release" -target "${FMK_NAME}" -sdk iphonesimulator

    # Cleaning the oldest.
    if [ -d "${INSTALL_DIR}" ]
    then
    rm -rf "${INSTALL_DIR}"
    fi

    # Creates and renews the final product folder.
    mkdir -p "${INSTALL_DIR}"
    mkdir -p "${INSTALL_DIR}/Versions"
    mkdir -p "${INSTALL_DIR}/Versions/${FMK_VERSION}"
    mkdir -p "${INSTALL_DIR}/Versions/${FMK_VERSION}/Resources"
    mkdir -p "${INSTALL_DIR}/Versions/${FMK_VERSION}/Headers"

    # Creates the internal links.
    # It MUST uses relative path, otherwise will not work when the folder is copied/moved.
    ln -s "${FMK_VERSION}" "${INSTALL_DIR}/Versions/Current"
    ln -s "Versions/Current/Headers" "${INSTALL_DIR}/Headers"
    ln -s "Versions/Current/Resources" "${INSTALL_DIR}/Resources"
    ln -s "Versions/Current/${FMK_NAME}" "${INSTALL_DIR}/${FMK_NAME}"

    # Copies the headers and resources files to the final product folder.
    cp -R "${DEVICE_DIR}/Headers/" "${INSTALL_DIR}/Versions/${FMK_VERSION}/Headers/"
    cp -R "${DEVICE_DIR}/" "${INSTALL_DIR}/Versions/${FMK_VERSION}/Resources/"

    # Removes the binary and header from the resources folder.
    rm -r "${INSTALL_DIR}/Versions/${FMK_VERSION}/Resources/Headers" "${INSTALL_DIR}/Versions/${FMK_VERSION}/Resources/${FMK_NAME}"

    # Uses the Lipo Tool to merge both binary files (i386 + armv6/armv7) into one Universal final product.
    lipo -create "${DEVICE_DIR}/${FMK_NAME}" "${SIMULATOR_DIR}/${FMK_NAME}" -output "${INSTALL_DIR}/Versions/${FMK_VERSION}/${FMK_NAME}"

    rm -r "${WRK_DIR}"


    Step 7: Build the Aggregate Target

    We have completed all necessary steps and your framework is ready to build. Now build the aggregate target and bundle target, you will find a new folder under <project root directory>\Products and it will be given the name <bundle name>.framework. This is your new framework! It contains the header files that developers will need and the compiled source code.

    Your next step will be to create a project that uses this framework. When you do so you will want to import the framework. Do this by navigating to the "Build Settings" tab under your app target then click the "+" under "Link Binaries with Libraries" just as you would with any standard framework. The only difference is that your framework will not be in the list. You will have to click "Add Other..." then navigate to the <bundle name>.framework folder. Select that folder and click "Open". 


    Your new framework has been added and you or the other developer can begin developing! 

    Happy Coding :) 

    Thursday, June 28, 2012

    Handle NSLog before release

    Go to your Build settings and under the Debug configuration add a value to "Preprocessor Macros" value like:      DEBUG_MODE=1
    Make sure you only do this for the Debug configuration and not for Beta or Release versions. Then in a common header file you can do something like:


    #ifdef DEBUG_MODE
    #define DLog( s, ... ) NSLog( @"<%@:(%d)> %@", [[NSString stringWithUTF8String:__FILE__] lastPathComponent], __LINE__, [NSString stringWithFormat:(s), ##__VA_ARGS__] )
    #else
    #define DLog( s, ... )
    #endif


    Now instead of NSLog use DLog everywhere. When testing and debugging, you'll get debug messages. When you're ready to release a beta or final release, all those DLog lines automatically become empty and nothing gets emitted. This way there's no manual setting of variables or commenting of NSLogs required. Picking your build target takes care of it.

    Wednesday, June 20, 2012

    iPhone/iPad Technical Interview Question(FAQ) with answers(Part 3)


    Prev….(Part 2) 

    Q14. What are the ways to store data localy on device ? 
    A.

    We store data localy in device through:
    1. Plist.
    2. NSUserDefaults.
    3. SQLite.
    4. CoreData.

    Q15. What is the way to store value as default in application without using nsuserdefault for the application run firts time, because first time there will be no any data in nsuserdefault.
    A.  
    Through Plist.


    Q16.  What is the significant of passing (NSDictionary *)launchOptions in application didFinishLaunchingWithOptions ? What are the options in application didFinishLaunchingWithOptions ?
    A.

     Launching an application by tapping its icon, an application can be launched in order to respond to a specific type of event.

    For example, it could be launched in response to an incoming push notification, it could be asked to open a file, or it could be launched to handle some background event that it had requested. In all of these cases, the options dictionary passed to theapplication:didFinishLaunchingWithOptions: method provides information about the reason for the launch.
    In situations where the application is already running, the methods of the application delegate are called in response to key changes.
    There are 7 launch options key:
    UIApplicationLaunchOptionsURLKey;
    UIApplicationLaunchOptionsSourceApplicationKey;
    UIApplicationLaunchOptionsRemoteNotificationKey;
    UIApplicationLaunchOptionsAnnotationKey;
    UIApplicationLaunchOptionsLocalNotificationKey;
    UIApplicationLaunchOptionsLocationKey;
    UIApplicationLaunchOptionsNewsstandDownloadsKey;
    For example:
    When you actually receive a notification, there are 2 way it can be handel in our application:
    1.    When application is not running, and user click on view button on the notification. To interpret this notification we have to implement application:didFinishLaunchingWithOptions:  instead of  applicationDidFinishLaunching: like this:

    - (BOOL)application:(UIApplication *)application didFinishLaunchingWithOptions:(NSDictionary *)launchOptions
    {
      NSDictionary* userInfo = [launchOptions valueForKey:@"UIApplicationLaunchOptionsRemoteNotificationKey"];
      NSDictionary *payLoad= [userInfo objectForKey:@"aps"];
      NSDictionary *alertMsg = [userInfo objectForKey:@"alert"];
      NSDictionary * badgeCount = [userInfo objectForKey:@"badge"];
    //....do something with this.
    }

    2.    And when application is already in running state, in this case application delegate receives a call to application:didReceiveRemoteNotification:. This method also receives userInfo like this:
    -(void)application:(UIApplication *)application didReceiveRemoteNotification:(NSDictionary *)userInfo
    {
    NSDictionary *payLoad= [userInfo objectForKey:@"aps"];
      NSDictionary *alertMsg = [userInfo objectForKey:@"alert"];
      NSDictionary * badgeCount = [userInfo objectForKey:@"badge"];
    //....do something with this.

    }

    Q17.  What are the design patterns in iOS ?
    A.

    Q18.  Difference between Cocoa and Cocoa touch ?

    A. 

    Q19.  What is KVC and KVO ?

    A. 
    Its a design pattern follow by iOS. Its a.......

    Q20.  What architecture iOS follows ?

    A. 


    Q21.  What are collection methods ?

    A. 
    For objects that manage a collection of objects (each called an element of that collection).
    For example: - (void)addElement:(elementType)anObj;
               - (void)removeElement:(elementType)anObj;
               - (NSArray *)elements;


    Q22.  How to handle NSLog before release   ?

    A. 


    All The Best :)

    WILL BE CONTINUE… :
    )